Tuesday 29 July 2014

Cultural fest + sports week

So few days back, our college organised a sports week (though it was only 3 days long ;\) + cultural festival thing-y :P I know it sounds bad but no-one knows till date what to call it but none-the-less it was AWESOME \m/ 
There were a lot of fun games and competitions. I personally liked the 'outdoor snakes and ladder'. In this game you would need a huge board (human size?!) to play and teams of 2. One would move on the board and the other would roll the dice. It was super fun to play and to watch. :D BTW i lost in case anyone was wondering (T_T) I didn't get those yummy chocolates </3 Here is a pic of the game (not mine) I was so engrossed with playing and having fun that i didn't take any snaps ;P

Pretty cool eh?
We played volley-ball and our team lost BADLY (#*.*#) but we were 1st in cricket (I am a star cricketer \m/) so it balances out everything :D Have you guys ever played tug of war? It was my first time playing it and i loved it <3 There were other games too but these 3 were worth mentioning, for my merit :P
So in indoor competitions, we had a mehendi competition and guess what, we won \m/ I actually had to do nothing so basically it was my friend who won but i got a nice mehendi so it was a win-win situation <3 Here's some pic of those mehendi designs:

Top 5 woo-hoo!
There's the winner's hand! That is, mine <3 We won because of my friend's speed, she made it within half-an hour!
This girl has some serious talent i tell you. I loved hers the most (but i'm still glad we came first). She was second.
Third
Fourth
She was such a sweetheart that she even made it on the back of my hand, yay me <3
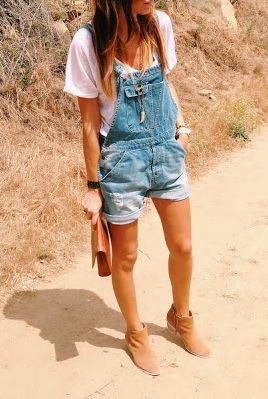
I love ripped boyfriend jeans <3 though i don't have a boyfriend ;D
In the next post i will tell you guys how it turned out (mehendi). 
We played a lot, competed a lot but most of all we all had fun. Days like these make me feel re-energized. You guys should also take part in such events. The cultural fest was at the end and sadly we couldn't take part in it :( All those practice time for the cultural fest clashed with our sports time so yeah i chose sports, which in normal case, i would have never given a thought. I am really bad at outdoor sports, more like i have a really weak body. Except playing basketball, badminton and volleyball for fun i have never played any other games. But after playing in the sports week I think of myself as a new person who would like to do stuffs that i normally would pass :)

Thanks for reading. Leave a comment if you ever did something that you normally wouldn't do :D

Love,
Prerna.

Monday 28 July 2014

DIY overalls from pants/jeans

Recently i have seen many people rocking a pair of overalls. They can be chic if worn properly. I thought about making one. It is a really easy DIY. You just have to have an inspiration about how you would like your overalls to look like. Mine was this:


Items needed:

1. One size larger pants/jeans.
2. Thread.
3. Needle.
4. Sewing machine.
5. Cute buttons. (optional)

I had already made shorts out of the jeans i used in this project so i had the shorts part and the remaining 2 leg parts. A little sewing knowledge is needed for this DIY.

Shorts:

1. Wear your jeans/pants. 
2. Mark how short you want your shorts to be. Add 1" for hemming if you want. I personally hemmed it, it gave my overalls a really nice polished look.
3. Cut and hem.

Now to make it a overall the steps should be as followed:

1. Open up the seams of one leg completely and cut a rectangle out of it first of your desired length (front). Cut bigger than needed as you can always make it smaller but don't cut too much because you will be using the left-over portion from this leg part to make its back.

 2. The 2nd step will be of 2 parts: 

Invisible hemming
  • To sew this rectangle to the front of the shorts. I actually used invisible stitches to sew these two together. If you don't know how to do that then use normal stitches or sewing machine.
  • Try it on and sew the sides in whatever shape you think looks the best on you.
 

3. Now sew the left-over rectangle-ish piece to the back of the shorts And again find a shape you like the best (for sides). and sew it on place.  
This time i used a sewing machine for sides (both front and back).


 4. Now with the other leg part we have to make 2 tubes that will go over your shoulder. Find out the size which works for you. The tube i made were 1.5" wide each.

5. Again wear you half-made overalls and place the tubes over the front and back. If you like what you see, then pin them on place.


6. And then sew them on place. I even hemmed it.


 I further added 2 cute buttons to the front. This is how my overalls looked. I just added a belt. :D

Animal? anyone?
I absolutely love them. They didn't turned out like my inspiration but it works for me :D I actually prefers this one over the one that inspired me (maybe 'cause i put a lot of hard work in it :D).

I hope you guys liked this :) Comment if you need any help :)
Thanks for reading :)

Love,
Prerna.

Saturday 26 July 2014

Lace cardigan (Easy)

I am a big fan of pinterest. It has everything you can ask for. :D I once saw this lace cardigan and instantly fell in love with it <3

The one i saw.

 It looks so feminine and comfortable but it was quite price-y so i thought about making one. I found this beautiful lace and thought it would be perfect for my DIY project. The fabric has a bit of stretch to it so it might be difficult for a beginner to sew.

 My friend deleted all images so i have none to show you how i actually made it. T_T But i will try my best to tell you how i made it :)

My version.
Steps:

1. First of all i took my measurements, let-
  • Sleeve length - a"
  • Arm hole (it should be not too tight or loose) - b"
  • Length of cardigan - c"
  • Shoulder to shoulder - d"
  • Shoulder to neck - e"
2.  Cut out pieces-
  • The back piece should be of size d+3" X c"+1". If you need to hem it then add 1" to c. I didn't need to do it.
  • There will be 2 front pieces of size e+3" X c"+1". Again add another inch for hemming if needed.
  • And 2 sleeves of same size b+1" X a"+1". Add 1" to a for hemming. my sleeves did not have any curved shape, i just cut in a straight line.
3. Sewing-
  • And what i basically did was sew the shoulder of the 2 front pieces to the single back piece (right sides together). It took a lot of trial and error to get it right so be patient. And if you don't understand something then ask me.
  • Sew the sleeves to the main piece (right sides together).
  • Sew all the sides together.

4. The fourth step includes hemming all the raw edges. I only needed to hem the front pieces :D

And voila, you have your own lace cardigan :D It is a bit difficult project for beginner as the fabric is lace which is stretchy. But i have seen that it was a really forgiving fabric.

Some tips:
1. Cut bigger as you can always make it smaller later on.
2. Hand sew it first it will A LOT. It doesn't have to be perfect.
3. Use paper below the fabric for sewing. It makes sewing it easier. Just pull the paper to remove it.

I hope you liked it :) If so, please leave a comment.
Thanks for reading.

Love,
Prerna

Friday 25 July 2014

Some lolita sewing inspiration for me :D

Not many people like to dress this way and so few can actually pull this look off. I mean all those cute bows, ruffles, laces might make you look like an adult trying to pass off as a child. But dressing like this is not about all those bows etc. It is a very elegant style of clothing that is in no way cosplay. And if you are a fan of manga (like me) chances are you are/will be fascinated by all of this. But you don't have to be a manga fan to admire its beauty :D
Here are some few dresses that i really really love :) And believe me buying them will surely cost you a fortune T_T so yeah I'm gonna learn to sew them (hopefully). These 5 dresses basically covers everything that i love <3

1. The first one is this cute ruffle-y, bow-y, corset-y black dress. What's not to love here? Maybe i would add long sleeves to it and add ruffles in the end.

Childish much?

2. Its more or less like the first black dress except the bows here are from thin ribbons and instead of those (beautiful) ruffles lace is used here <3

Girly much?

3. This one has a lot, i mean it, A LOT of bows. And I, for one, love bows <3 Okay, so maybe i would lessen the no. of bows in this dress :D The Victorian era feel this dress gives <3

TMB? (too many bows?)

4. Anyone 'Alice in wonderland' fan? I am :D The story is fascinating. And this dress is a perfect Alice's dress. Notice the hat? It really pulls this dress together. Its the most simple dress i could find :D
 

Love the color combination.

5. I am digging sailor outfits these days and i'm thinking about making one too. And this jsk dress screams sailor :D Its really simple with just a bow and and a two-tiered skirt part.


Navy-Red? or Navy-white? Which one you prefer more?

Do you like these dresses? If you could choose any one out of these dresses to wear which one would you wear?
I will surely level up (video game lover!) my sewing skills and will someday make one of these as a gift for myself for continuing sewing :) 

I hope you liked it and sorry if i said anything wrong about lolita fashion here.
Thanks for reading, please leave a comment.

Love,
Prerna

Thursday 24 July 2014

DIY fabric bow belt :D

I am in love with bows <3 They make everything look great (okay, maybe i am exaggerating but you get the point :D) So i made this fabric belt with bow, its super cute and super easy and you don't have to be a sewing master to get it right :D

Items needed:

1. Fabric. (Any kind of fabric will do. I used black cotton fabric)
2. Matching thread.
3. Needle.
4. Sewing machine.
5. Snaps/hooks.


Steps:

1. Measure you waist and add 6" to it. Cut out a rectangular piece of size waist+6" X 2 times the width+1". Mine was 33" X 3" (i.e. my waist measurement is 25" and i wanted a width of 1")

2. Fold over half an inch of fabric on both sides (large sides of rectangle) Iron it and sew/hot glue it on place. I used a sewing machine to do this but you can hand stitch it as well.


3. Make 3 tubes of sizes:
  • 1.5" X 4.5"
  • 1.5" X 3.5"
  • !.5" X 2"
4. Place the tubes over each other. (Biggest tube to small one)
5. Pinch it in the middle and hand sew it. You can use hot glue as well but i prefer sewing it. You are basically making a bow.

An example on how to make the bow.
6. Place this bow on the end of the long strip of fabric we have sewn above. And hand sew it. You can use hot glue to do so too.

7. Sew or hot glue snaps/hook.


And you get your very own DIYed fabric bow belt :D Easy right?
You can wear it with skirts, dresses, tunic etc. But yeah it is just for decoration, don't use it to hold up any clothing item.
To be honest you don't even need to sew anything. Just use hot glue and then it will be a no sew project :D

I hope you liked it and if so, please leave a comment :)
Thanks for reading :)

Love,
Prerna

Tuesday 22 July 2014

Nail paints and nail art :D

In this post i will tell you guys about my favorite nail paint color and a simple nail art :D

So this is my recent favorite in nail color :D I thought about doing something more to my nails but the color itself looked really nice and then i couldn't. I LOVE it. Its my favorite color for now :D What about you guys? Liked it?


Pastel purple, is it?
The nail art will be this one. I love this. I really really do. And i totally believe that nail arts are one of the few ways in dressing up any outfit :D What do you think? There really are many shades of pink. What would you call this one? I have absolutely no idea.
I just applied this pink nail paint, let it dry and used a tooth-pick to make these dots.

I don't really believe in buying things which i don't need except more clothes/shoes :D But hey i save in these things like a dotting tool. I know it doesn't cost much but that's how i justify my impulse shopping. T^T

I hope you guys liked it. Please leave a comment.
Thanks for reading :)

Love,
Prerna.

DIY easy/basic breezy off-shoulder tee and cropped tee

So, i made these easy breezy top which is quite summery. I made it as an off-shoulder top but its not necessary for you to do the same. It is an easy sew for those who just started sewing :D

Items needed:

1. Fabric (you should be able to fold it twice and still have half of your body and one arm covered) i used a cotton blend fabric and to be honest you can use any type of fabric with any print you want :)
2. Scissors.
3. Sewing machine. (You can hand-sew it as well)
4. Matching thread.
5. An old tee. (It doesn't need to be fitted)


Steps:

1. Fold your fabric twice and lay your folded t-shirt over it. (The folds of t-shirt should be over the folds of fabric)

2. Cut it out. If you want it to be fitted then just add 1" to it for sewing (seam) and then cut. Otherwise, you can add inches to it according to how loose you want it to be. I made it quite loose.
And I also cut the neck hole. Again you can make it as big/deep you want but start small as you can always make it bigger.

3. Lay the two pieces together (wrong side together) and sew all around (shoulders, arms and sides).

4. Now this step is optional. If you need to hem your shoulders/bottom/sleeves/neck-hole you can do so. I didn't need to as my fabric was not fraying (yay me :D)
And ta-da that's it :D A super easy and super cute DIY top for your summer. And it looks good too. You can literally use any fabric to make this DIY top. I loved it so much that i made another top. I made the other one a bit shorter and whoa it looked great :D I have to wear tanks tops underneath both of these tops as they are both see-through.

You can make a normal sized neck-hole for a simple tee as well :)


My first try. I tuck it in my jeans/shorts and wear simple sandals.


Its shorter version. I must admit i wear this cropped version more.
I hope you liked it :)
Please leave a comment if you liked it or couldn't understand anything :)
Thanks for reading :D

Love,
Prerna

Tuesday 15 July 2014

some natural stuffs for sensitive skin

My skin is super sensitive and oily. I have had to rely on natural things for my skin problems. Using man-made products always causes a breakout. So if you are like me then i guess these products will help you a lot. I used these products and they have worked miracles for me :)


1. The first product i will recommend is fuller's earth/multani mitti. I didn't use it as pack but used it to clean my face regularly. 
  • It soaks up extra oil from your face.
  • It makes you feel refreshed :D

Wet your face beforehand with water and then apply a paste of fuller's earth and plus over your face and neck and massage it. After 2 min wash your face with cold water.


Fuller's earth 

2. The second product will be olive oil. Damn this oil is probably the best for literally everything, including your skin but just don't use it too much and blot it out.
  • It makes your skin super soft and
  • Maintains your skin tone.
  • It is also good for your brows and lashes (Yay! bonus benefits)
 I generally use it at night. Just 4-5 drops of oil and gently massage your face and neck. 

This is the one i use.

3. Next would be honey.
  • Its a super cool weapon against acne and acne marks :D 
  • I use honey in all the face masks i make :D 
  • You can use it as a moisturizer too. 
  • And don't forget its good for our health as well :D


Honey

4. Yogurt is another key ingredient for my face packs.
  • It deep cleanses our skin.
  • Reduce breakouts.
  • Reduces blemishes. 
You can use it by itself or add something (like honey) to it.


Yogurt

5. If lemon is something that irritates your skin then tomato is what you should be using!
  •  It is a GREAT product for reducing acne.
  • You can just use it by itself as a toner after cleansing your face.
  • It also soothes your skin if you have a sun burn. (I told you its great) :D
  • Shrinks pores.


Squeeze it to get its juice.

6. Another amazing product sent from heaven - Aloe-vera
  • It detoxifies our body.
  • It gives the skin a radiant glow.
  • It has anti-inflammatory properties, i.e., it reduces acne.
  • Helps treat sun burns.
  • It makes our skin more vibrant and young looking.
  • It is a natural moisturizer.
It is a disgustingly great product for everyone :D and its not meant to be rude.


Scoop out the gel-like thing from it and use it on your face and neck.

All the products that i use on my face, i use it on my neck too. The above products have helped me a great deal and i hope it helps you too. You can make additions to this list as well in the comments below :)

Hope you liked it.
Thanks for reading :)

Love,
Prerna

Monday 14 July 2014

Lacey heart cut-out t-shirt D.I.Y.

I really dig heart cut-out shirts/top these days. They really make the shirt/top feel romantic. They are super sweet and super easy to make :)

For this tutorial all you will need is a top/t-shirt/shirt you would like to refashion, a pair of scissors, lace and the usual, thread and needle.

I actually don't use templates or patterns to make something, their directions are too much to follow ;(


Steps:
1. I just folded the back (just the back) of my top in half and cut out a half heart. when straightened you will get a full heart. You can just leave it here or go further like i did.

2. I had some lace left over from when i made a lace cardigan so i used it to cover the heart (I am not too much of an open back fan) And sew it onto place by hand stitching first (the lace was kinda stretchy)

 3. It was a heart so i thought it would be more fun to use red thread to sew the lace and so i did :)

I really do like how it turned out but if i could redo it again i would have used red embroidery thread instead of the normal one. And I am officially in love with lace <3

I dig it <3
I hope you liked it. 
Thanks for reading and please leave a comment if you liked it, it will mean a lot to me :)

Love,
Prerna

Friday 11 July 2014

Super easy scarf from t-shirt (no sew)

I just love DIY's. I get some sort of satisfaction by sewing things for myself. Its really easy and fun. I have made a lot of stuff for myself ranging from a scarf to a dress, the easiest one is the one in this post. You just need an old tee and a pair of scissors for this super easy and super quick DIY.


This is how the scarf will look.
Steps:


  • Take an old tee whose print/color you love.
  • Cut through the t-shirt. It depends on how thick you want your scarf to be.
 

The lower portion is your scarf :D You might need to hem the edges if you want or need. In my case i didn't hemmed it simply because i didn't need to (there was no fraying)

Its a super easy DIY for beginners. If you guys liked it or if there is anything you want to request then comment below.

Hope you liked it :)
Thanks for reading :)

Love,
Prerna

OOTD..?!

So, its my first ootd. Whoa! I'm feeling weird. Its nice to know that people actually read my blog, makes me happy :) If you could just tell me how you feel about my posts? What should i do to make it better? in the comments, it will seriously help me a lot. :)

Here, I wore a flower print romper (D.I.Y.) with a knit shrug, polka-dot scarf (D.I.Y) and black tights.


My outfit.

Knit shrug


D.I.Y. Romper


D.I.Y Polka-dot scarf

I am a huge fan of DIY's, mostly because i can't seem to find clothes that fit me. T.T
It hurts a lot when i find something really nice and it won't fit me?! So i took the road of DIY's. :D
Its pretty fun and super easy.

Comment below if you would like me to tell you how i made that romper. :)

Hope you liked it :)
Thanks for reading :)

Love,
Prerna

Tuesday 8 July 2014

White sauce sandwich (mmm.., delicious)

So my aunt asked me to cook something for her (face-palm, I can't cook), but being a really optimistic person i thought why not try? Being a lazy bum i chose an easy recipe. (easy and yum <3)
Well, here it is.

Ingredients needed:

1. Butter/Ghee - 3 tablespoon
2. Refined flour/Maida - 2 teaspoon
3. Milk - 3 cups
4. black pepper - however you like (I used 1 teaspoon)
5. Boiled sweet corn - 1.5
6. Grinded boiled corn - 0.5
7. Bread slices
8. Cheese

Steps:
 
1.In a saucepan, melt the butter over medium low heat.
2. Add the flour and keep mixing till the raw smell of the flour is gone and a nice nutty aroma comes.
3. Add warm milk little by little and keep mixing the mixture.
4. Add salt, pepper and other optional ingredients (if you are adding) and bring it to a boil.
5. Simmer for 2-3 minutes and then add grinded corn and sweet corn to it.
6. Let it boil for 5 minutes or so and then let it cool. (It gets thick as it cools down)
7. Put a layer of it over a bread slice and grate the cheese over it.
8. Then put it in a sandwich maker. I personally like to make the sandwich in a pan using butter. And that's it :D

Super easy right? And damn its delicious :D I just love cheese <3

I hope you liked it.
Thanks for reading.

Love,
Prerna